

Building an AI Agent - Part 1
Open for all?

In our previous post, we set ourselves a challenge: build our own AI agent. Why? Because the best way to understand how something works is to build it.
We really wanted to know: can someone who doesn’t know how to code build their own AI agent, or is that still just something only experienced developers can do?
In this first post, Part 1, we’re just getting started by putting together the main pieces that make everything work like building with LEGO bricks. We’ll check out what each part does and how they all fit. Then, in Part 2 next week, we’ll show you how we turned this into a special server that can easily connect and chat with other programs and agents using MCP.
Here the plan at a high level:
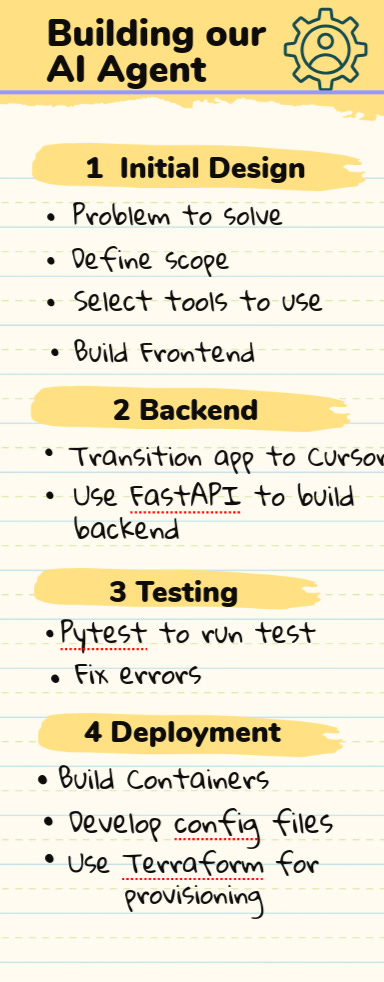
Note: Image created with Adobe Express
Step 1 - Initial Design
We began with a practical goal —> How can we stay on top of the most relevant, timely developments in AI for writing this blog?
From that emerged a more ambitious idea…could we develop a system that could (scope):
Discover trustworthy & relevant AI news from reputable sources
Filter stories based on our focus areas (e.g. consumer AI, agent use cases)
Summarize articles into digestible takeaways
Eventually help shape what we write by influencing our understanding

Note: Image create with ChatGPT
We sketched a basic architecture consisting of two parts: a frontend application (the part you see and use) and a backend server (the part you don’t see but is key!) communicating with it via its API. At this stage, this wasn’t yet an "agent" , just a lightweight “AI News Agent” web app pulling and summarizing news articles via RSS feeds in which the frontend displays articles pulled and summarises them.
📘 What is RSS?
RSS (Really Simple Syndication) is a standard format for publishing frequently updated content—like blog posts or news headlines. It lets you subscribe to updates across multiple sites in one place. Our blog has its own RSS feed here.
The early motivation was to consolidate news, learning, and future predictions around AI into one place and later expand into broader topics. We started with a minimal working product along the following lines:

Note: Image created with Excalidraw
Step 2 - Developing the Backend
We started building using Lovable, initially hosted on their platform and then moved it to a personal site, here. It wasn’t flashy, we deliberately kept it bare-bones to focus on functionality over form.

Note: Frontend created with Lovable
The frontend was developed using Lovable initially before development was transitioned fully into Cursor. The backend was built entirely using Cursor and overall perhaps 90%+ of the development of the system was done using that rather than Lovable.
It took about two days to get a basic working system running locally, retrieving AI news with the frontend and backend operating independently.
Visual development tools like Lovable are great for prototyping, but they hit limits when logic or data processing becomes more complex. That’s when we needed to shift to building and integrating a backend for the frontend to work with.
We chose to build the backend in Python using the FastAPI framework. This gave us full control over how data was fetched, processed, and served. The backend acts as the system’s core logic engine and is exposed through an API, fully documented here, which serves as a technical contract between backend and frontend.
🧩 What does this API do?
The API provides a set of documented endpoints that allow external clients (including the frontend or other agents) to interact with the backend. These endpoints cover everything from RSS feed management to intelligent summarization.
These features are available through easy-to-use RESTful endpoints (that is, easy-to-use web addresses), so you can connect the backend to other applications, including a future AI agent. The current API includes the following endpoints:

These endpoints directly support the following key features:
Manage RSS feeds (
/sources)Validate feed URLs (
/sources/validate)Fetch articles from all registered sources (
/news)Summarize content using the Perplexity API (
/summarize)Apply topic clustering to help organize content by theme
The frontend builds on top of this with some added features:
Basic user authentication using Supabase, including social login via Google and GitHub.
Smart caching to avoid redundant work, by storing fetched article links, summaries, and tags. Cached articles are permanently stored in Supabase.
Configuration settings for setting the Perplexity API key and selecting RSS sources, saved in browser storage
All of this allowed us to create a reliable and reusable system for fetching, processing, and presenting AI news.
Step 3 - Testing
Once the backend was working, we made sure it was reliable. We used a tool called pytest (which we set up in Cursor) to run lots of tests. These tests checked that each API endpoint (special web addresses apps use to talk to each other) worked the right way, even when someone tried to use them the wrong way.
Testing like this helped us catch mistakes early and keep everything running smoothly as we made changes. Since Cursor development is a lot of trial and error, testing often was really important. We made small changes and checked them often to keep things under control.
Sometimes, things went wrong in Cursor, like missing files, weird formatting, or problems from code that Cursor made automatically. Fixing these problems meant we had to really understand our code and think like a developer.
For the front end, our testing was less formal. We just used the app ourselves—browsing articles, checking news feeds, and reading summaries—to make sure everything worked. This hands-on testing helped us find problems that our automatic tests might have missed.
Step 4 - Deployment
Testing was challenging but deployment was harder. Lovable supports easy deployment for simple, self-contained apps. With just a click of the Publish button, you can deploy directly to their cloud as illustrated below:

However, once our system included both a frontend and a separate backend, things became more complex. To deploy both parts, we had to:
Build two Docker containers: one for the frontend, one for the backend
Write Dockerfiles for each container to define build and runtime behavior
Develop configuration files:
Use Terraform to automate the provisioning and deployment of both containers, both locally (for testing) and to the remote environment
We used Docker Desktop on Mac for local testing, which helped us resolve environment issues before attempting remote deployment.
Deploying something felt a lot harder than expected, much more complicated than just using easy no-code tools. Instead of just working in a web browser, we had to handle the behind-the-scenes tools like servers and how to get the app ready to run. This showed that it's still really tough for people who aren't tech experts to put their projects online all by themselves, even when using simple coding tools like vibe coding.
Challenges
Technical Barriers
Visual tools like Lovable lower the barrier to entry for basic app development but building a functioning AI agent is still far from accessible to non-technical users.
Why? Because production-ready systems usually require:
Developing custom backend services
Packaging those services using Docker for portability
Handling cross-platform compatibility across local and cloud environments
Writing deployment scripts to automate build and release processes
These aren’t optional extras. They’re essential steps for deploying anything beyond a toy prototype.
Privacy & Compliance
Even with user-friendly tools like Supabase (which integrates easily with Lovable), careful handling of user data is still required.
Adding external APIs, like the Perplexity summarization service, brings added complexity:
How is user data shared or processed by third parties?
Are requests encrypted and securely stored?
Are data deletion and access controls in place?
These are compliance and trust issues, not just technical ones.
The Reality of MCP
We’re trying out something called MCP (Model Context Protocol) to let our backend work as part of a bigger team of AI agents.
The idea initially sounds promising, but using MCP is harder than it seems. Setting it up is complicated, and you really need to know how APIs work, how to format information going in and out, and how to keep things safe and secure.
We believe MCP as a kind of “standard wrapper” for APIs, not as a simple, ready-to-use tool for connecting different agents. It’s not the main building block for agent systems, at least not yet.
But things are getting somehow simpler with:
Google’s Agent2Agent (A2A) is making it easier for different agents to talk to each other.
New security standards are being created to deal with problems like prompt injection.
MCP tools are improving, so in the future, using them might be much simpler than it is today, its inevitable.
Initial Conclusions
We noticed something important while working with today’s AI tools: No-code platforms make it easier for anyone to build the parts of an app you see and use (the frontend). But if you want to create a really smart AI agent yourself, you still need to know a lot about how things work behind the scenes, like backends, APIs, and how to put everything online.
It’s getting easier to use AI agents that other people have made. But making your own from scratch? That still takes real tech skills.
🌱 A Note of Optimism
Despite the challenges, we’re hopeful. Tools are getting better fast. Standards like MCP and A2A, and new ways to keep agents secure, are making it easier for everyone to build their own AI agents.
The best part: we now have a working starting point, a recipe we can keep improving.
What’s next? We’ll upgrade our backend so it works perfectly with MCP, which will help us build really flexible AI agents. After that, we’ll look into the coolest ways people might use these agents in the future.
More soon!
M,M&F
Tools we used:
Lovable - to create our frontend
Cursor - for generating and testing the AI news agent backend
For chart generations - Adobe Acrobat, Adobe express, ChatGPT
Previous blogs: